Retargeting
Using Unreal Engine 5's (hereinafter, "UE5's") IK Rig and Retargeting system you can retarget animations in real-time as well as already recorded data (animation sequences).
You need an "IKRig" asset for both the source and target skeletons, as well as an "IKRetargeter" asset to link the two.

For convenience, we included assets to retarget mocopi app motion data to any skeletal mesh that uses the UE5 Mannequin Skeleton, or any Metahuman.
The plugin assets that support retargeting and Live retargeting to the UE5 Mannequin, require you to have the UE5 Mannequin already present in your project. You can get these from the UE Marketplace or from some UE5 project templates, such as the Third Person Game template.
The following will cover how to use those assets.
Reference
Reference
If you would like to learn how you can create your own retargeting assets (IKRig & IKRetargeter) for your own custom skeletal mesh, you can follow Unreal Engine's official documentation.
Retargeting Recordings
Retargeting recordings is done via the IKRetargeter asset.
Here, we explain how to use asset to retarget recorded data to any skeletal mesh that uses the UE5 Mannequin skeleton ("SK_Mannequin").
- Click [Window]>[Content Browser]>[Content Browser 1 - 4] in that order from the Unreal Editor menu bar.
The [Content Browser] tab/window appears. - Open [All]>[Plugins]>[MocopiLiveLink Content]>[UnrealMannequin] in that order in the left pane of the [Content Browser] tab/window.
-
Double-click the "RTG_Mocopi_UEMannequin" asset.
The RTG_Mocopi_UEMannequin window appears.

- Specify the target skeletal mesh in the "Target Preview Mesh" field.
- Select the recorded data (animation sequence).
Double-click on the recorded data to preview the retargeting results. -
Click [Export Selected Animations].
The Batch Export Retargeted Animations window appears.

-
Select the destination folder, and click [Export] button.
The retargeted recording (animation sequence) is saved.

The recorded data retargeting is now complete.
Caution
If you are not retargeting to the UE5 Mannequin Skeleton or the Metahuman Skeleton, you will create the "IK Rig" asset for the target skeletal mesh and create an "IK Retargeter" asset and set the following:
- Set the "IK_Mocopi" as the "Source IKRig Asset"
- Set the created "IK Rig" asset as the "Target IKRig Asset"
Reference
When you are retargeting to a metahuman, use the "RTG_Mocopi_Metahuman" asset in the [All]>[Plugins]>[MocopiLiveLink Content]>[Metahuman].
Retargeting Real-Time
To retarget mocopi app’s motion data to other actors in real-time, you leverage the functionality of the "IKRetargeter" asset within an Animation Blueprint.
The first step for real-time retargeting is to create an animation blueprint targeted for the skeleton of your mesh.
The Unreal Engine Plugin provides an animated blueprint with the target skeleton "SK_Mannequin" for use with the UE5 mannequin.
Here, we explain how to create and set up the blueprint, using the case of retargeting mocopi app’s motion data to a UE5 mannequin as an example.
- Click [Window]>[Content Browser]>[Content Browser 1 - 4] in that order from the Unreal Editor menu bar.
The [Content Browser] tab/window appears. - Open [All]>[Plugins]>[MocopiLiveLink Content]>[UnrealMannequin] in that order in the left pane of the [Content Browser] tab/window.
-
Double-click the "ABP_Mannequin" blueprint.
The Message window appears.

- Click [Yes].
The Pic Replacement Skeleton window appears. - Click [SK_Mannequin].
-
Click [OK].
The ABP_Mannequin window appears.

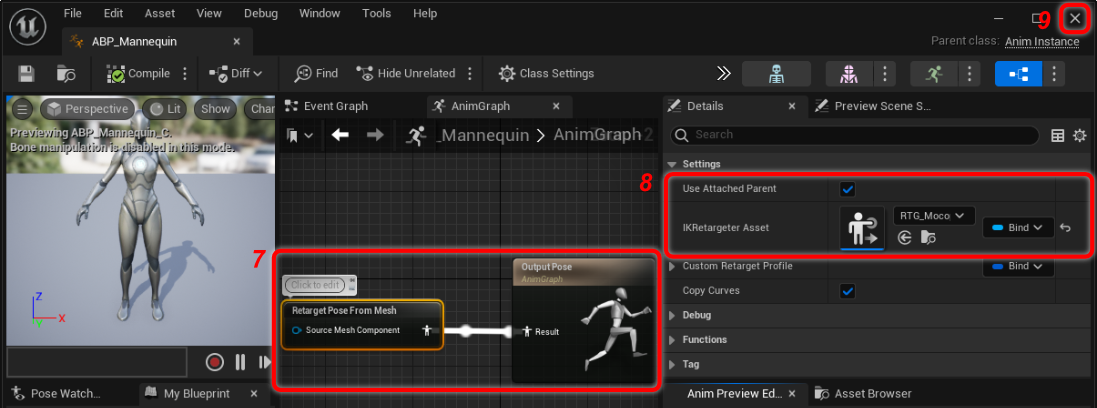
- In [AnimGraph] tab, create a "Retarget Pose From Mesh" node and connect it to the result of the "OutputPose" node.
When you use the provided blueprint, skip to the next step. -
Click the "Retarget Pose From Mesh", and set up the following items in [Details] tab.
Setting item Setting details Settings Use Attached Parent Check IKRetargeter Asset Select the corresponding "IKRetargeter" asset which retargets mocopi to the desired target skeleton.
When you use the provided blueprint, select [RTG_Mocopi_UEMannequin].
-
Click [x] in the upper right corner of the screen.
The animation blueprint setting up is complete.
-
Double-click the "MannequinActor" blueprint in the [Content Browser] tab/window.
The MannequinActor window appears.

-
Check the following in the [Components] tab.
- Two skeletal mesh components - a source, and a target.
- The target skeletal mesh component is a child of the source skeletal mesh component.
- A "Live Link Skeletal Animation" component is created.

Reference
When you are creating your own actor blueprint, create and place three components as shown on the above.
- Click the [Souce_SkeletalMesh] component.
-
In [Details] tab, set the following items.
Setting item Setting details Animation Animation Mode Use Animation Blueprint Anim Class ABP_Mocopi_C Mesh Skeletal Mesh MocopiMannequin Rendering Visible Uncheck
* Hide the mocopi mannequin's mesh.
- Click the [Target_SkeletalMesh].
-
In [Details] tab, set the following items.
Setting item Setting details Animation Animation Mode Use Animation Blueprint Anim Class ABP_Mannequin_C Mesh Skeletal Mesh UE5 mannequin's skeletal mesh
* Specify your desired Skeletal Mesh.Rendering Visible Check
* Show the UE5 mannequin's mesh. - Click [Compile] button.
- Click the "Save" icon.
-
Click [x] in the upper right corner of the screen.

- Start receiving the motion data.
Refer to STEP 2: Procedures 1 to 5 of Moving an Actor Using the Unreal Engine Plugin for how to receive the motion data. -
Drag and drop the "MannequinActor" blueprint into your scene.
The UE5 Mannequin animates on the scene according to motion data.

Real-time retargeting is now complete.