Packaging the mocopi Receiver plugin for UE as part of a game
The mocopi Receiver plugin for Unreal Engine can be packaged as part of a game, having the correct project setup.
To include mocopi functionality into your Game, you simply need to create the mocopi Live Link source via a Blueprint. Below we walk you through a simple example setup:
- Refer to Moving an Actor Using the Unreal Engine Plugin and perform the advance preparations.
Caution
-
We support packaging the mocopi plugin in C++ projects. If your game is a Blueprint project, you will need to convert it to a C++ project (you can do so by adding an empty C++ class to a BP project).
-
If your mocopi plugin is installed to Engine:
- Make sure that the “MocopiLiveLink” folder is inside your engine’s “Plugins/Marketplace” folder. Otherwise you will get an error during the packaging.
-
If your mocopi plugin is installed to your Project with UE5.0 or UE5.1:
- For packaging to succeed on Mac, you will need to add the following code snippet to the ”Target.cs” file of your C++ project, inside the Target definition.
if (Platform == UnrealTargetPlatform.Mac)
{
bOverrideBuildEnvironment = true; AdditionalCompilerArguments = "-Wno-deprecated-anon-enum-enum-conversion";
}
-
If you don’t have any Metahuman or Unreal Mannequin assets in your project, you may need to remove the files listed below for successful packaging:
[Plugins/MocopiLiveLink/Content/Metahuman/ABP_Metahuman]
[Plugins/MocopiLiveLink/Content/UnrealMannequin/ABP_Mannequin]
-
- Click [Window]>[Content Browser]>[Content Browser 1 - 4] in that order from the Unreal Editor menu bar.
The [Content Browser] tab/window appears. - Drag and drop MocopiActor from the [Content Browser] onto the scene.
(This could also be any other character you have already set up to animate with mocopi) - Open the blueprint of your character and go to the Event Graph tab.
- Use the “Create Mocopi Source” Blueprint function to create a source at any point in your game:
- Right-click anywhere on the graph and type “mocopi” to find the function node.
- 「Connect it to the Event BeginPlay node. This makes it so that when your game starts, a mocopi source is created with the given parameters.
- Additionally, you can remove the source with the built in “Remove Source” (LiveLink source) function. In the example below, we are destroying our created source whenever the game ends.
Note: You can connect the output Handle from our function directly to the Source Handle of the “Remove Source” function. The example shows you how to use the output Handle to set a Blueprint variable, named “Source” in this instance.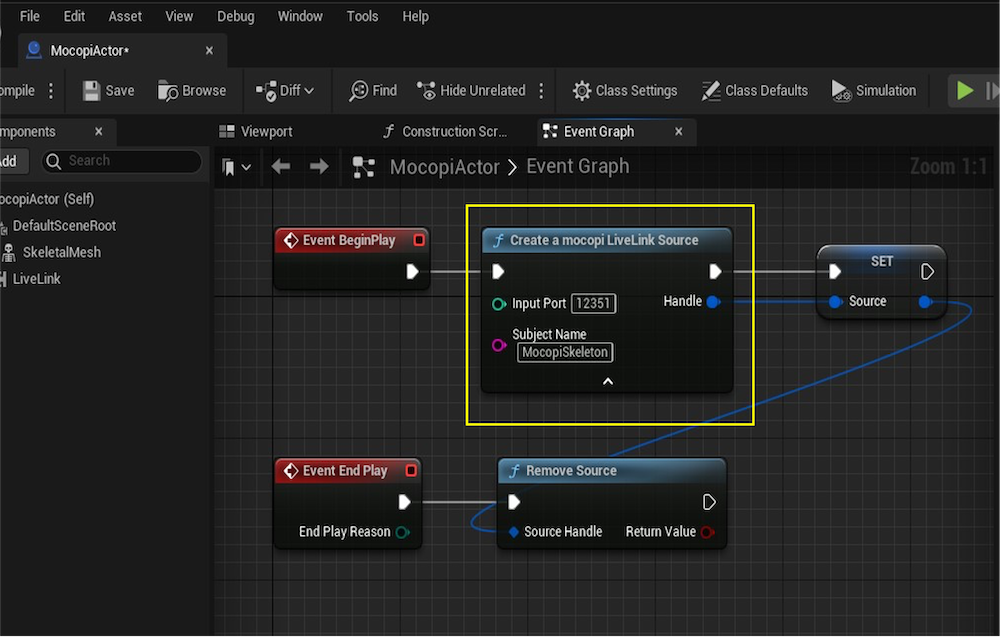
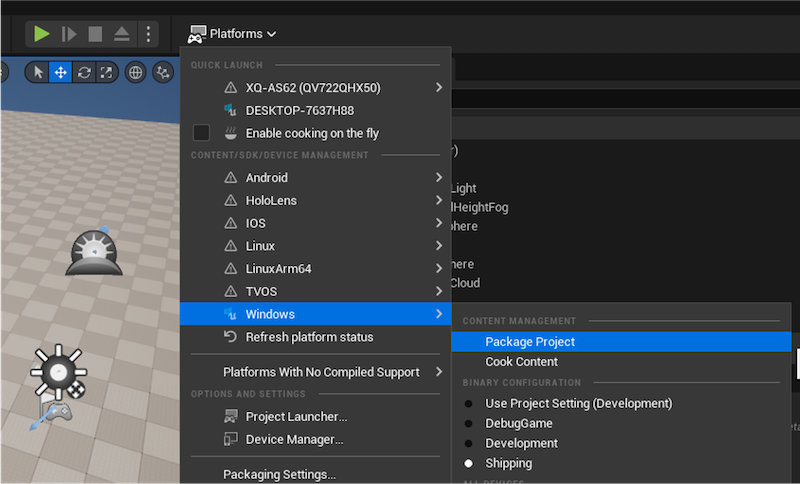
- Once you’ve verified your game functionality by running it in the editor, you can package your game via the “Package Project” operation as shown below: